こんにちは、久しぶりに和朗です。
ASP.NETのControllerの承認フィルターAuthorizeAttributeにはOnAuthorizationメソッドがあり、ここで認証を行うことができますが、 今回は、なんでもできちゃうDelegatingHandlerを利用して認証ロジックの組み込みを行ってみたいと思います。
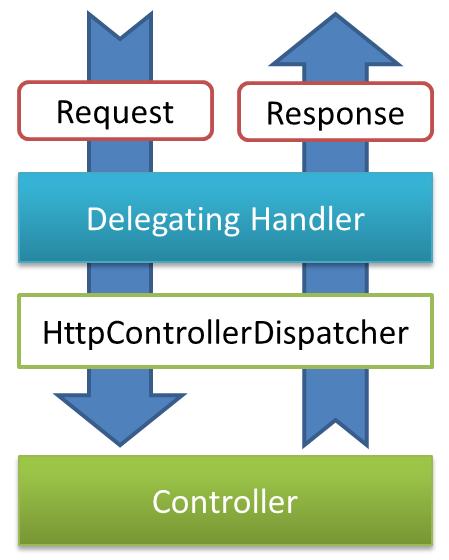
RequestとResponseの間に入っているので、Controllerに処理を渡さずにResponseすることも可能ですし、Request内容を変更することも可能!
今回利用したもの
- System.Net.Http.DelegatingHandler
- System.Security.Principal.GenericIdentity
- System.Security.Principal.GenericPrincipal
- System.Web.Http.AuthorizeAttribute
まずは、GenericIdentity
public class CustomeIdentity : System.Security.Principal.GenericIdentity
{
    public CustomeIdentity(string name) : base(name) { }
    /// <summary>
    /// Authorize属性と紐付けるための、プロパティ(ロールA,ロールBなど)
    /// </summary>
    public string[] Roles { set; get; }
}
identityに業務独自のプロパティを設けたい場合に利用。identityは処理のどこからでも参照可能なので便利。
次に、GenericPrincipal
public class CustomePrincipal : System.Security.Principal.GenericPrincipal
{
    public CustomePrincipal(CustomeIdentity identity) : base(identity, identity.Roles) { }
}
ここは、AuthorizeAttributeのroleとの紐付けに利用しました。
そしてメインの、DelegatingHandler
public class CustomeHandler : System.Net.Http.DelegatingHandler
{
    protected override Task<HttpResponseMessage> SendAsync(HttpRequestMessage request, CancellationToken cancellationToken)
    {
        CustomeIdentity identity = null;
        {   // 認証に利用できるであろう情報
            var headerAuthorization = request.Headers.Authorization.Parameter;
            var fromIp = ((HttpContextWrapper)request.Properties["MS_HttpContext"]).Request.UserHostAddress;
            var targetUrl = request.RequestUri.ToString();
            var method = request.Method.Method;
            /*
                * 認証ロジック
                * 省略
                */
            identity = new CustomeIdentity("一意な文字列");
        }

        if (identity == null)
        {   // 認証NG
            return Task<HttpResponseMessage>.Factory.StartNew(() =>
                {
                    return new HttpResponseMessage(HttpStatusCode.BadRequest)
                    {
                        Content = new StringContent("Error encountered while attempting to process authorization token")
                    };
                });
        }
        else
        {   // 認証成功
            var principal = new CustomePrincipal(identity);
            this.SetPrincipal(principal);
        }

        return base.SendAsync(request, cancellationToken);
    }

    /// <summary>
    /// http://www.asp.net/web-api/overview/security/authentication-and-authorization-in-aspnet-web-api
    /// </summary>
    /// <param name="p"></param>
    private void SetPrincipal(System.Security.Principal.IPrincipal p)
    {
        // 2つのプロパティにセットする必要があります。
        Thread.CurrentPrincipal = p;
        if (HttpContext.Current != null)
        {
            HttpContext.Current.User = p;
        }
    }
}
作成したハンドラをResisterに設定
public static class WebApiConfig
{
    public static void Register(HttpConfiguration config)
    {
        // カスタムハンドラの追加
        config.MessageHandlers.Add(new CustomeHandler());
    }
}
最後に、ApiControllerに利用可能なロールを設定
[System.Web.Http.Authorize(Roles = "ロールA,ロールB")]
public class CustomeController : System.Web.Http.ApiController
{
}
GenericPrincipalのコンストラクタで渡しているロールと紐付けられています。 コントローラやメソッドの属性としてAuthorizeが設定可能です。 コントローラ、メソッド単位でロールを意識することになり、安心感があります。
まとめ
今回の内容により、接続元(接続ユーザ)ごとに利用可能なURLをプログラムレベルで定義することが可能となり コントローラ作成時に常にセキュリティを意識した実装を行うことになります。 もう一つのメリットとして、ログ出力とidentityの連動もメリットだと考えます。 identityを利用することによって接続元の情報にどこからでもアクセス可能となるからです。